Administering Java Whitelists
Oracle finally added one major feature to Java that had been missing, the ability to whitelist sites. Now, admins can control which sites run java, what security level the apps run at, and even what version of Java the site will use. It does work pretty well, but it is not easy to set up and administer.
To set up the deployment rule set, which gives you all these new features, you need to create an xml file, turn it into a jar file, sign the jar file with a trusted certificate in a java keystore, and then deploy the file to any machine you want to run this. Easy, right? Well I’ll go through all the steps you’ll need to follow to get these up and running in your environment!
First off, you are going to need to create your xml file. This documentation has a lot of information on creating the XML files, so I’ll just give you the very basics. You want to create a text file in ANSI encoding (default of Notepad) called ruleset.xml.
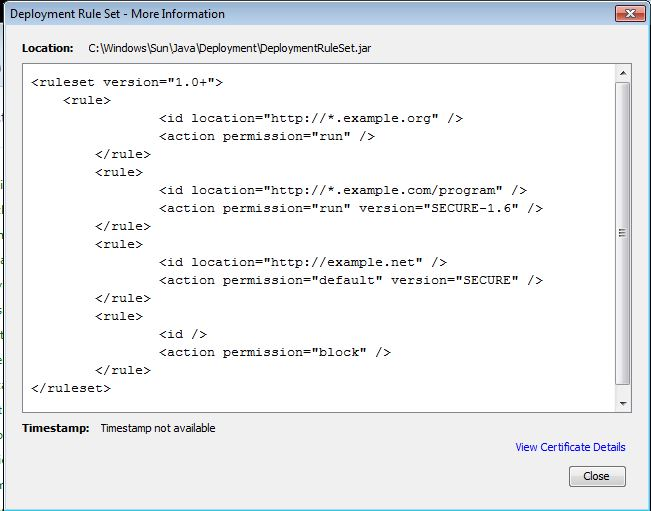
<ruleset version="1.0+">
    <rule>
		<id location="http://*.example.org" />
		<action permission="run" />
	</rule>
	<rule>
		<id location="http://*.example.com" />
		<action permission="run" version="SECURE-1.6" />
	</rule>
	<rule>
		<id location="http://example.net" />
		<action permission="default" version="SECURE" />
	</rule>
	<rule>
		<id />
		<action permission="block" />
	</rule>
</ruleset>
Here I have four example rules in the ruleset which I think will do what most admins want. The first rule will allow all java apps at *.example.org to run with no prompts, even if they are unsigned. The second example allows all apps at *.example.com to run on Java version 6. The third example defaults all java apps on example.net to run with secure permissions on Java 1.7, and the last example blocks all the rest. These rules are evaluated top down, so since the last rule is for all sites, no other sites will run Java.
Now that the ruleset.xml file is created, it’s time to turn it into a jar file. This site has some good documentation on creating and signing the jar file. The question instructions are, download the Java JDK, copy the ruleset.xml file to the bin folder of the JDK install location, where the jar.exe file is. Open a command prompt and cd to the location of jar.exe and ruleset.xml (probably at c:program filesJavajdk1.7.0_40bin). Now, type in this command:
jar -cvf DeploymentRuleSet.jar ruleset.xml
The reason everything needs to be in the same directory is because the jar file we are creating is just an archive (you can extract it with 7-Zip), and the ruleset.xml file needs to be at the root of this archive. If you specify a file path to ruleset, that file path is preserved in the jar file. The -cvf stands for create, verbose, and filename.
So now we have a jar file, how do we sign it? Well, you need a java keystore with a cert in it that is trusted on your computer. I’m going to assume you don’t have one of those and need to create one. You have two options:
1) Generate the keystore with a self signed certificate, extract the certificate and install it in your trusted root CA. 2) Import one of your already trusted certificates (you’ll need the file with the private and public key) into a new keystore
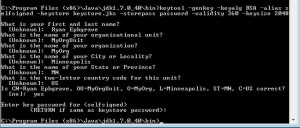
1: To generate a keystore, use this command found on this site:
keytool -genkey -keyalg RSA -alias selfsigned -keystore keystore.jks -storepass password -validity 360 -keysize 2048
Enter your information to create the certificate.
To extract the certificate from the keystore, use this command:
keytool -exportcert -keystore keystore.jks -alias selfsigned -file Cert.cer

And then you can install this cert into the trusted root CA. If you don’t know how to do this, here are some instructions on doing it through group policy…
2: My certificate had an extension of .pfx and it needs to be in a .p12 file, so i just renamed the extension. It worked for me, hopefully that will work for you. Now, run this command to import the .p12 file into a new keystore
Keytool -importkeystore -deststorepass password -destkeystore Keystore.jks -srcKeystore Cert.p12 -srcstoretype pkcs12 -srcstorepass password
You’ll want to change the -srcstorepass to the password of your certificate. After you type in this command, you should get something that says “Entry for alias…” after the word alias is the alias of the keystore, which we will need. For me, it was a long GUID.
—
Alright, now that we have a keystore with a trusted certificate in it, we can use that to sign the jar file. Go back to your command prompt that is in the jdk bin folder and type in this command:
jarsigner -verbose -keystore keystore.jks -signedjar DeploymentRuleSet.jar DeploymentRuleSet.jar selfsigned
Change “selfsigned” to the alias you had if you followed the steps in step 2. You’ll be prompted for the password. It is password if you followed step 1 to the letter, and it is whatever you put in for srcstorepass in step 2 if you followed those instructions.
Now, put the DeploymentRuleSet.jar file in one of these directories:
Windows: C:WindowsSunJavaDeployment Mac, Linux, Unix: /etc/.java/deployment
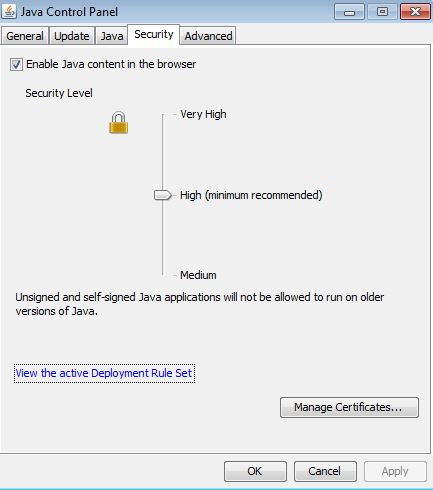
And you’re done! Boy, was that easy or what? You can verify the DeploymentRuleSet is in place by going to the Java console in control panel and clicking the security tab:
Click on “View the active Deployment Rule Set” and you will see your rule set!
Leave a Comment