Create Your Own Right Click Tools
I decided to write an updated version of this blog post since the old one used a tool I no longer use (XML Notepad) and now use Notepad++ for my right click tools writing. I hope you enjoy this guide!
Step 1: Find the GUID
Each right click action in the Configuration Manager console has a GUID associated with it. Using this GUID we can add actions to the console, but you first need to find it. I wrote a script months ago to help me find the GUID associated with any right click menu.
**Make sure you back up your actions folder before you run this script. You can back it up by going to your AdminConsole install folder \XmlStorage\Extensions and rename the Actions folder to Actions.old. If you installed the console to the default location, this folder is in:
C:\Program Files (x86)\Microsoft Configuration Manager\AdminConsole\XmlStorage\Extensions
If you do not have an Extensions folder or an Actions folder, don’t worry about this!
Here is the script:
$ConfigInstallPath = $env:SMS_ADMIN_UI_PATH | Out-String
$ConfigInstallPath = $ConfigInstallPath.Trim()
$XMLPath = $ConfigInstallPath -replace "\\bin\\i386", "\XmlStorage\ConsoleRoot"
$ActionsPath = $ConfigInstallPath -replace "\\bin\\i386", "\XmlStorage\Extensions\Actions"
Get-ChildItem "$XMLPath" -Filter "*.xml" -Recurse | ForEach-Object {
	$FullFileName = $_.FullName
	$FileContent = Get-Content $FullFileName
	foreach ($line in $FileContent) {
		if ($line.ToUpper().Contains("NAMESPACEGUID=")) {
			$SplitLine = $line.Split("`"")
			$GUID = $SplitLine[1]

			$FilePath = "$ActionsPath\$GUID"
			New-Item -ItemType Directory -Path $FilePath -ErrorAction SilentlyContinue | Out-Null
			$strOutput = "<ActionDescription Class=`"Executable`" DisplayName=`"$GUID`" MnemonicDisplayName=`"$GUID`" Description=`"$GUID`">`n"
			$strOutput = $strOutput + "<ShowOn><string>ContextMenu</string></ShowOn>`n"
			$strOutput = $strOutput + "<Executable><FilePath>cmd.exe</FilePath>`n"
			$strOutput = $strOutput + "<Parameters> /c Powershell.exe Add-Type -AssemblyName 'System.Windows.Forms';[Windows.Forms.Clipboard]::SetText('$GUID')</Parameters></Executable>`n"
			$strOutput = $strOutput + "</ActionDescription>"
			$strOutput > "$FilePath\File.xml"
		}
	}
}
You’ll want to run the script as an administrator so it can add files in C:\Program Files, or wherever your console is installed.
Once it is run, it creates a right click menu everywhere in the console, even in spots that don’t currently have menus. To get the menus, close and re-open your console.
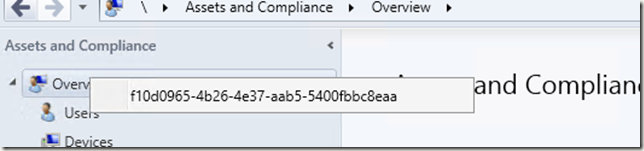
I created a new Software Update Group tool and need to add a menu there. The idea behind the tool is to right click on a Software Update Group, and it will let you look at all the Superseded/Expired and allow you to remove those updates from the group. To get the GUID I’ll need, I right click on any of my Software Update Groups. The GUID will be the same for all of them:
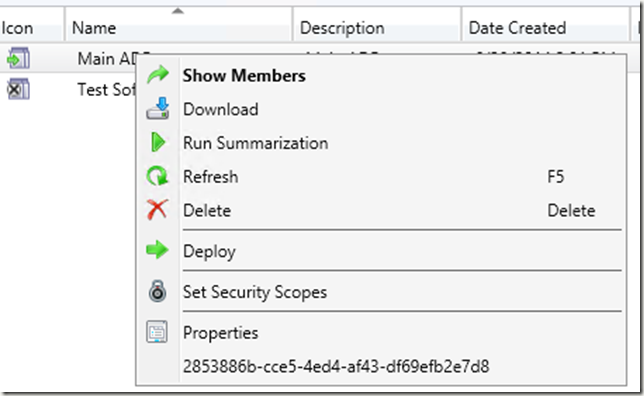
Click on the GUID (the thing that starts with 2853) and the GUID is now copied to your clipboard! Open Notepad and paste it into there to save for later. If it is not copied to your clipboard, well something in my script didn’t work and you’ll have to write it down the old fashioned way. Now, go back to your Extensions folder, delete the Actions folder, and rename Actions.old to Actions. Once again, the Extensions folder will be here if the Console was installed with default paths:
C:\Program Files (x86)\Microsoft Configuration Manager\AdminConsole\XmlStorage\Extensions
Go into your actions folder, create a new folder, and name it the GUID. In this example, I’ll create a folder and name it 2853886b-cce5-4ed4-af43-df69efb2e7d8 If the Console was installed with default paths, the new folder will be:
C:\Program Files (x86)\Microsoft Configuration Manager\AdminConsole\XmlStorage\Extensions\Actions\2853886b-cce5-4ed4-af43-df69efb2e7d8
Step 2: The XML
You’ll want to create a XML file in this folder and it can be named whatever you want. The order of the menus in the console is determined alphabetically by filename. I use Notepad++ to edit xml files, so open Notepad++ as an admin and open your new XML file. XML is fairly straightforward once you are used to it, and lucky for us we don’t need to know much for this! If you are completely new to XML and get lost in these examples, this guide on elements and this guide on attributes should catch you up.
Now that you are caught up, we can start writing the XML. Each item on a right click menu, even sub menus, are the element ActionDescription. There are two types of ActionDescripion that I use, Group and Executable. Group will make a submenu while executable will allow you to call a command line.
First, I’ll show you how to make an executable.
When I create a new element, I always close it off right away to avoid confusion later. The first element we need to make (the root element) is ActionDescription:
<ActionDescription>

</ActionDescription>
ActionDescription will need some attributes to tell the console what it is. You’ll want the Class description to tell it what type this is (Executable), and the DisplayName attribute to show what the title should be. You can also add a Description attribute if you want to add a note of what this does, but it isn’t needed:
<ActionDescription Class ="Executable" DisplayName="Remove Expired Updates" MnemonicDisplayName="Test" Description="Not a required value">

</ActionDescription>
Next, you need a sub element to tell the console where this menu should go. The sub element is called ShowOn and the two values I use are ContextMenu (Right Click Menu) and DefaultHomeTab (Ribbon).
<ActionDescription Class ="Executable" DisplayName="Remove Expired Updates" MnemonicDisplayName="Test" Description="Not a required value">
	<ShowOn>
		<string>ContextMenu</string>
		<string>DefaultHomeTab</string>
	</ShowOn>

</ActionDescription>
Since this is an executable, you’ll need the Executable element:
<ActionDescription Class ="Executable" DisplayName="Remove Expired Updates" MnemonicDisplayName="Test" Description="Not a required value">
	<ShowOn>
		<string>ContextMenu</string>
		<string>DefaultHomeTab</string>
	</ShowOn>
	<Executable>

	</Executable>
</ActionDescription>
Next, you need a FilePath element to tell the console what program will be called. You can also specify some parameters for the file with the Parameters element. I am calling a vbs script, so I need to specify wscript.exe as the executable and the vbs script as the parameter:
<ActionDescription Class ="Executable" DisplayName="Remove Expired Updates" MnemonicDisplayName="Test" Description="Not a required value">
	<ShowOn>
		<string>ContextMenu</string>
		<string>DefaultHomeTab</string>
	</ShowOn>
	<Executable>
		<FilePath>"wscript.exe"</FilePath>
		<Parameters> "C:\SilentOpenPS.vbs"</Parameters>
	</Executable>
</ActionDescription>
And now, you’re done! Open the console and see your new menu:

Now, I’ll show you how to make a submenu. In Notepad++, create the ActionDescription element.
<ActionDescription>

</ActionDescription>
You’ll need some attributes. The ones I use are DisplayName, Class, and Description. We are making a submenu, so the Class is Group. DisplayName is whatever you want the menu to be in the console, and Description isn’t required, but is nice to say what it is:
<ActionDescription Class="Group" DisplayName="Software Update Group Actions" Description="The main Software Update group">

</ActionDescription>
Next, you need a sub element to tell the console where this menu should go. The sub element is called ShowOn and the two values I use are ContextMenu (Right Click Menu) and DefaultHomeTab (Ribbon).
<ActionDescription Class="Group" DisplayName="Software Update Group Actions" Description="The main Software Update group">
	<ShowOn>
		<string>ContextMenu</string>
		<string>DefaultHomeTab</string>
	</ShowOn>

</ActionDescription>
Now, we need the element ActionGroups since this is a sub menu:
<ActionDescription Class="Group" DisplayName="Software Update Group Actions" Description="The main Software Update group">
	<ShowOn>
		<string>ContextMenu</string>
		<string>DefaultHomeTab</string>
	</ShowOn>
	<ActionGroups>

	</ActionGroups>
</ActionDescription>
And now we can put the executable element here. You can just copy and paste the executable element from before in the ActionGroups, and fix the spacing so it looks nice:
<ActionDescription Class="Group" DisplayName="Software Update Group Actions" Description="The main Software Update group">
	<ShowOn>
		<string>ContextMenu</string>
		<string>DefaultHomeTab</string>
	</ShowOn>
	<ActionGroups>
		<ActionDescription Class ="Executable" DisplayName="Remove Expired Updates" MnemonicDisplayName="Test" Description="Not a required value">
			<ShowOn>
				<string>ContextMenu</string>
				<string>DefaultHomeTab</string>
			</ShowOn>
			<Executable>
				<FilePath>"wscript.exe"</FilePath>
				<Parameters> "C:\SilentOpenPS.vbs" </Parameters>
			</Executable>
		</ActionDescription>
	</ActionGroups>
</ActionDescription>
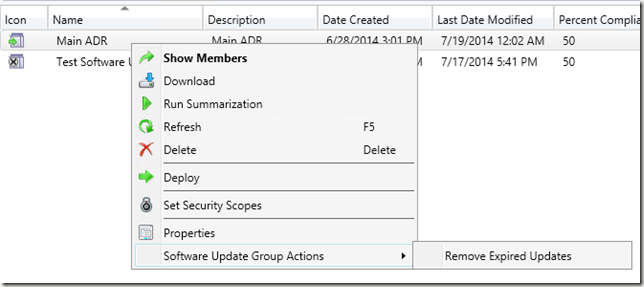
Save, close and re-open your console and you now have a sub menu:
Step 3: Find the Parameters
So, are we done now? Nope! Now you need to know how to add in Configuration Manager specific parameters. So, the whole purpose of the tool I created was to show you information about the Software Update Group I clicked on. How does my script know which group I selected? The configuration manager console displays information through WQL queries. If we know the WQL query the console used to display information to us, we can use that to send this information to our script.
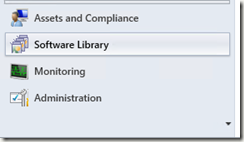
Hopefully you saved that GUID from the beginning. If not, this is probably your first time doing this and you can use the practice anyway. Go back and get the GUID. I’m adding a menu to Software Update Groups so the GUID I’m using is 2853886b-cce5-4ed4-af43-df69efb2e7d8. Go to the ConsoleRoot folder of your Configuration Manager Console located here if you installed with default paths: C:\Program Files (x86)\Microsoft Configuration Manager\AdminConsole\XmlStorage\ConsoleRoot and Right Click + Edit the SoftwareLibraryNode.xml file. I’m opening this file because I’m on the Software Library Node in the console:
Here is a list of the nodes and what XML file drives them:
Assets and Compliance – AssetManagementNode.xml Software Library – SoftwareLibraryNode.xml Monitoring – MonitoringNode.xml Administration – SiteConfigurationNode.xml Tools – ToolsNode.xml
Once you are in the XML file for your node, do a Ctrl+F for the GUID. The line below the GUID should be the query used. For Software Update Groups, the query used to display information is:

Select * From SMS_AuthorizationList ORDER BY LocalizedDisplayName
See, it is pulling all information from SMS_AuthorizationList so that means we can pass any* property in the class SMS_AuthorizationList (I have not been able to pass arrays as arguments yet, so not all types of properties can be passed). Google SMS_AuthorizationList for a list of properties we can access. When you google SMS_AuthorizationList, the first result is for SCCM 2007. Make sure you find the MSDN article for 2012. In this case, I had to google “SMS_AuthorizationList 2012” to find what I needed.
My script requires four bits of information. The name of the group, the ID of the group, the server name of the CM server, and the namespace where the WQL information is stored. Luckily, you can pass all these things to the script! For the name, you want LocalizedDisplayName. This is the name used for a number of things in ConfigMgr, so if you can’t find the name of something, look under this property. For ID, we want CI_ID. I’m not sure what CI stands for, but I’ve noticed a number of IDs are stored in this field. Server is __Server and Namespace is __Namespace. Server and Namespace will always be there no matter what the MSDN article says. You should always be able to use those fields.
To add these to our XML file, we need to pass the parameters in a specific syntax. Here is the syntax: “##SUB:[Parameter]##”. Here is my example XML file with those parameters put in:
<ActionDescription Class="Group" DisplayName="Software Update Group Actions" Description="The main Software Update group">
	<ShowOn>
		<string>ContextMenu</string>
		<string>DefaultHomeTab</string>
	</ShowOn>
	<ActionGroups>
		<ActionDescription Class ="Executable" DisplayName="Remove Expired Updates" MnemonicDisplayName="Test" Description="Not a required value">
			<ShowOn>
				<string>ContextMenu</string>
				<string>DefaultHomeTab</string>
			</ShowOn>
			<Executable>
				<FilePath>"wscript.exe"</FilePath>
				<Parameters> "C:\SilentOpenPS.vbs" "##SUB:LocalizedDisplayName##" "##SUB:CI_ID##" "##SUB:__Namespace##" "##SUB:__Server##"</Parameters>
			</Executable>
		</ActionDescription>
	</ActionGroups>
</ActionDescription>
Now, those parameters will be passed to my script and it will know what Software Update Group I’m clicking on!
Leave a Comment